In this section, you will create the .gitlab-ci.yml file that defines the CI/CD pipeline to deploy the Nexus fabric configurations.
The GitLab CI/CD pipeline consists of three sequential stages that automate the deployment workflow:
As you create and review the pipeline below, make note of the only and except keys. These dictate which stages are run against which branch or not run against a branch. As done in this lab, typically it is the main branch that is used with these keys. For example, when you want the pipeline to run against your staging setup, then you will notice that except is used so that a particular step is not run on main.
The last two pieces to this pipeline is the usage of the only key to also control when the pipeline is run. For example, you could have the pipeline run against staging every single time a commit is pushed to the repo. Depending on your DevOps process, that may be required, but for this lab, only will be used to control the pipeline running when a merge request is created. A merge request will be expanded on in the next section, but in short, this is the process of merging your code from another branch, such as your staging branch in this case, into main. The other piece is the script key that defines a list of the commands to execute to run your automation. Additionally, the artifacts key is used to save job output files (like validation results, terraform plans, and logs) so they can be passed between pipeline stages or downloaded for review.
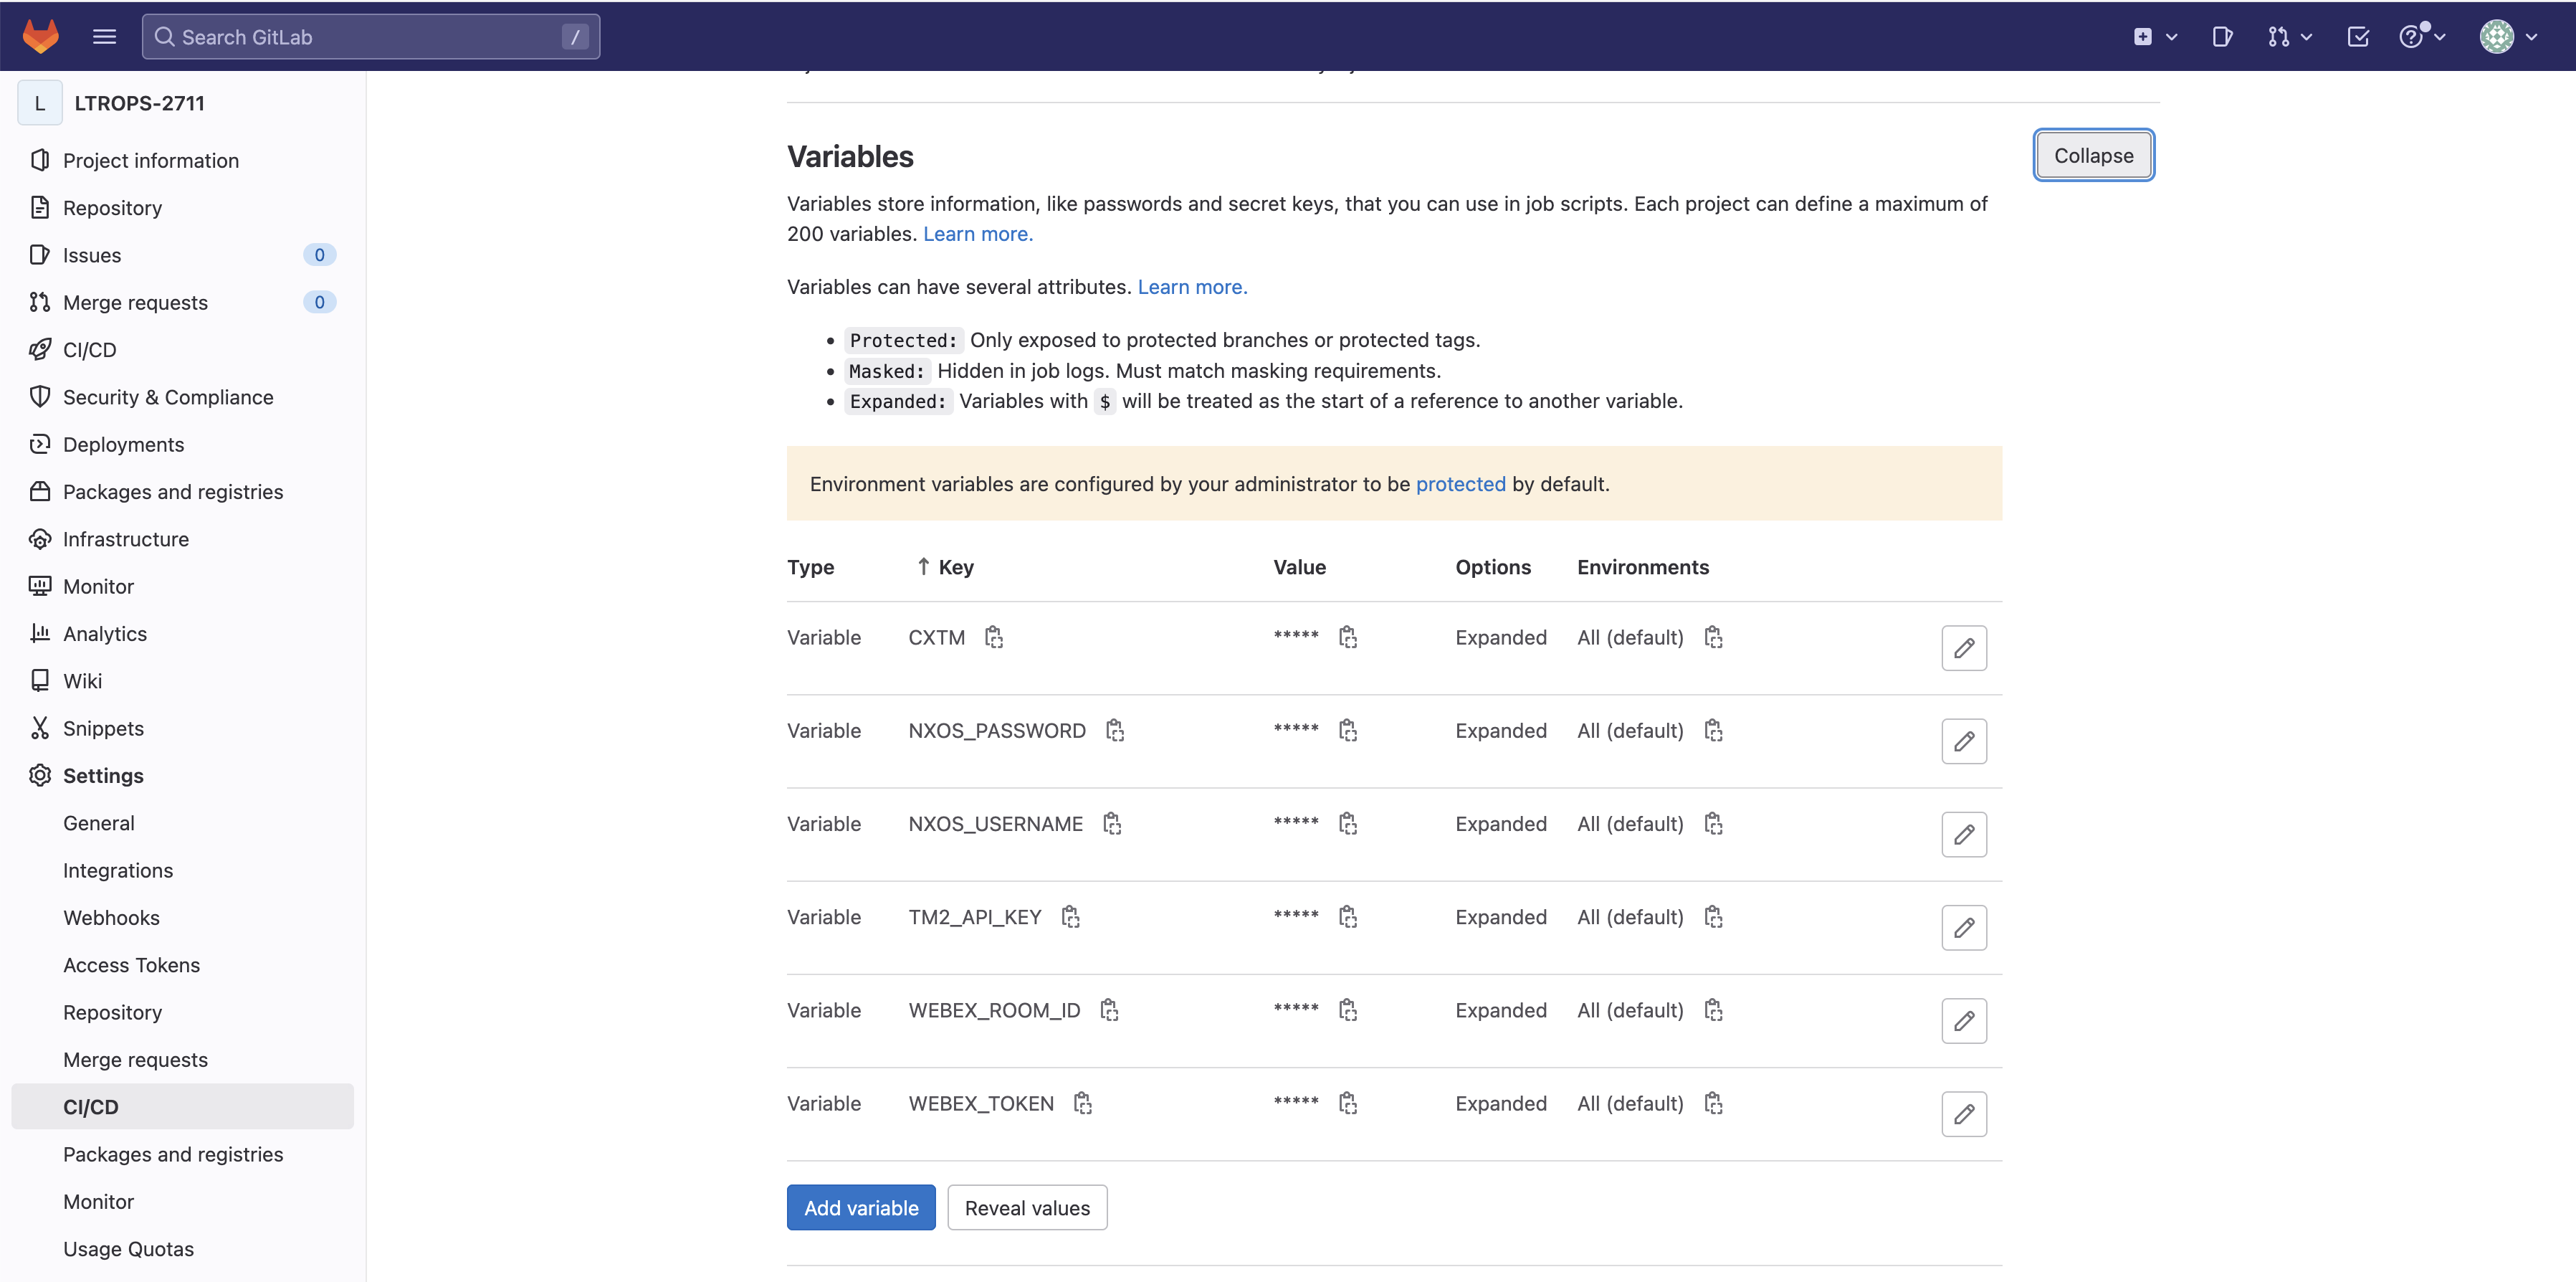
The variables section defines environment variables used throughout the pipeline, including credentials for NX-OS devices (NXOS_USERNAME, NXOS_PASSWORD), Webex notifications (WEBEX_ROOM_ID, WEBEX_TOKEN), and Terraform state management configurations. These variable values are already pre-populated in the CI/CD Variables section of your GitLab project settings, so the pipeline can securely access them during execution without exposing sensitive credentials in the YAML file.
Pipeline variables allow you to securely store sensitive information like credentials, API tokens, and configuration parameters outside of your code. GitLab stores these variables encrypted in the project settings, and they are injected into the pipeline environment during execution. This approach follows security best practices by separating secrets from your source code while making them accessible to your CI/CD automation.
For this lab, the initially required pipeline variables have already been created and populated in your GitLab project's CI/CD settings. Let's navigate to view these pre-configured variables by returning to your GitLab browser window and accessing the CI/CD settings.
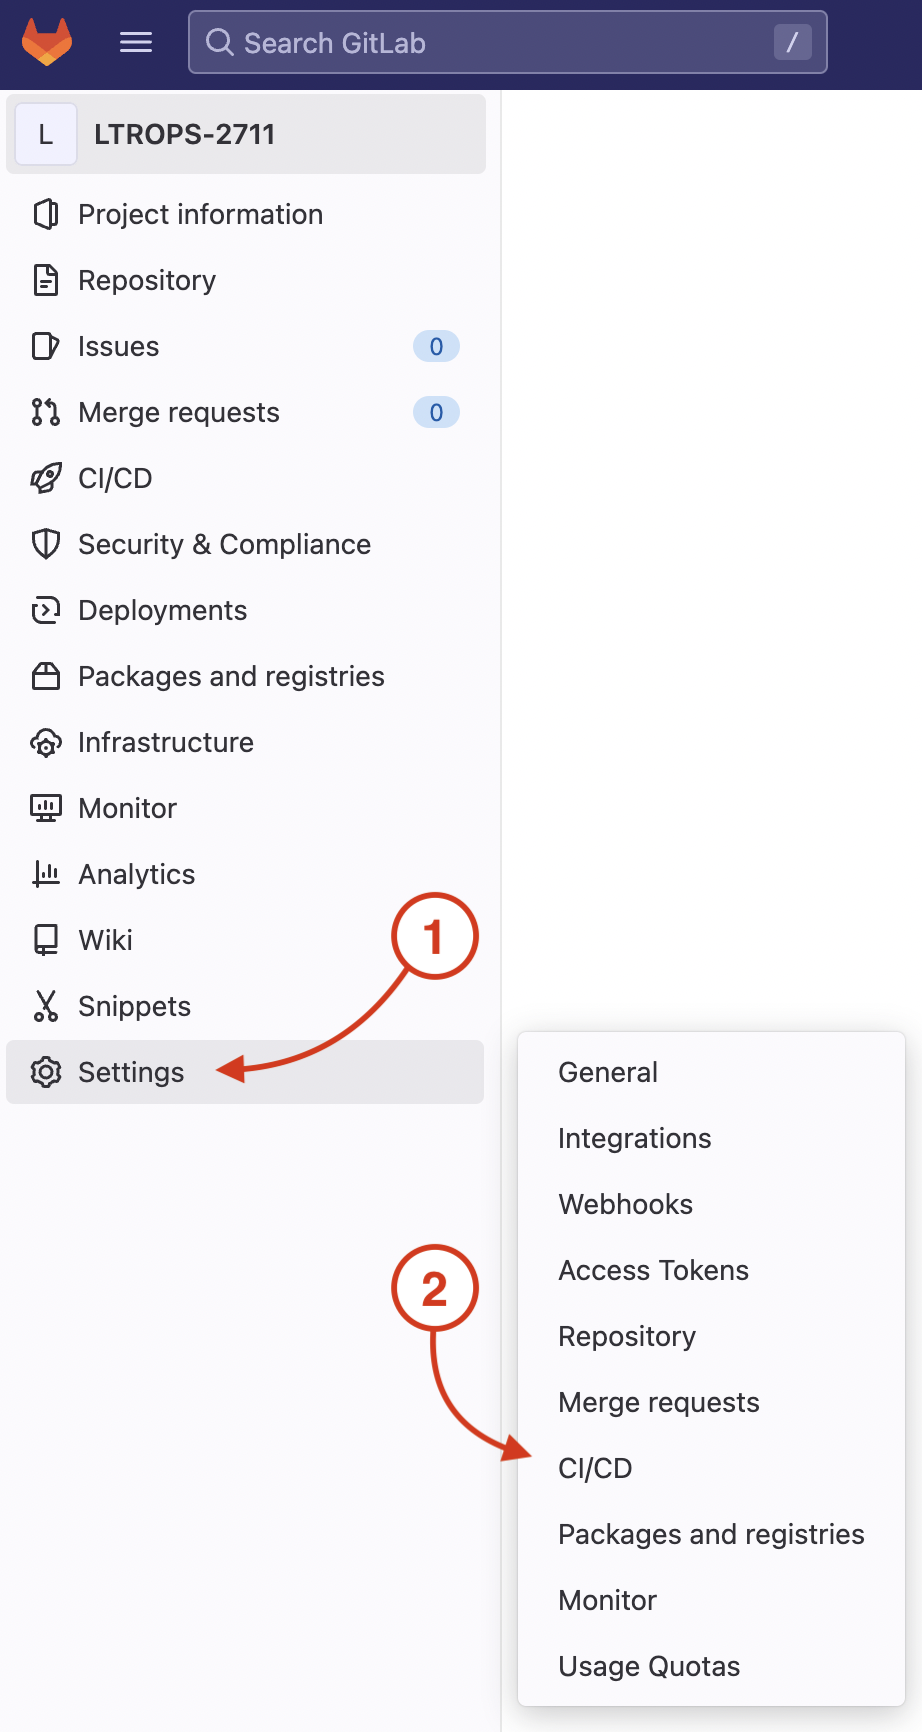
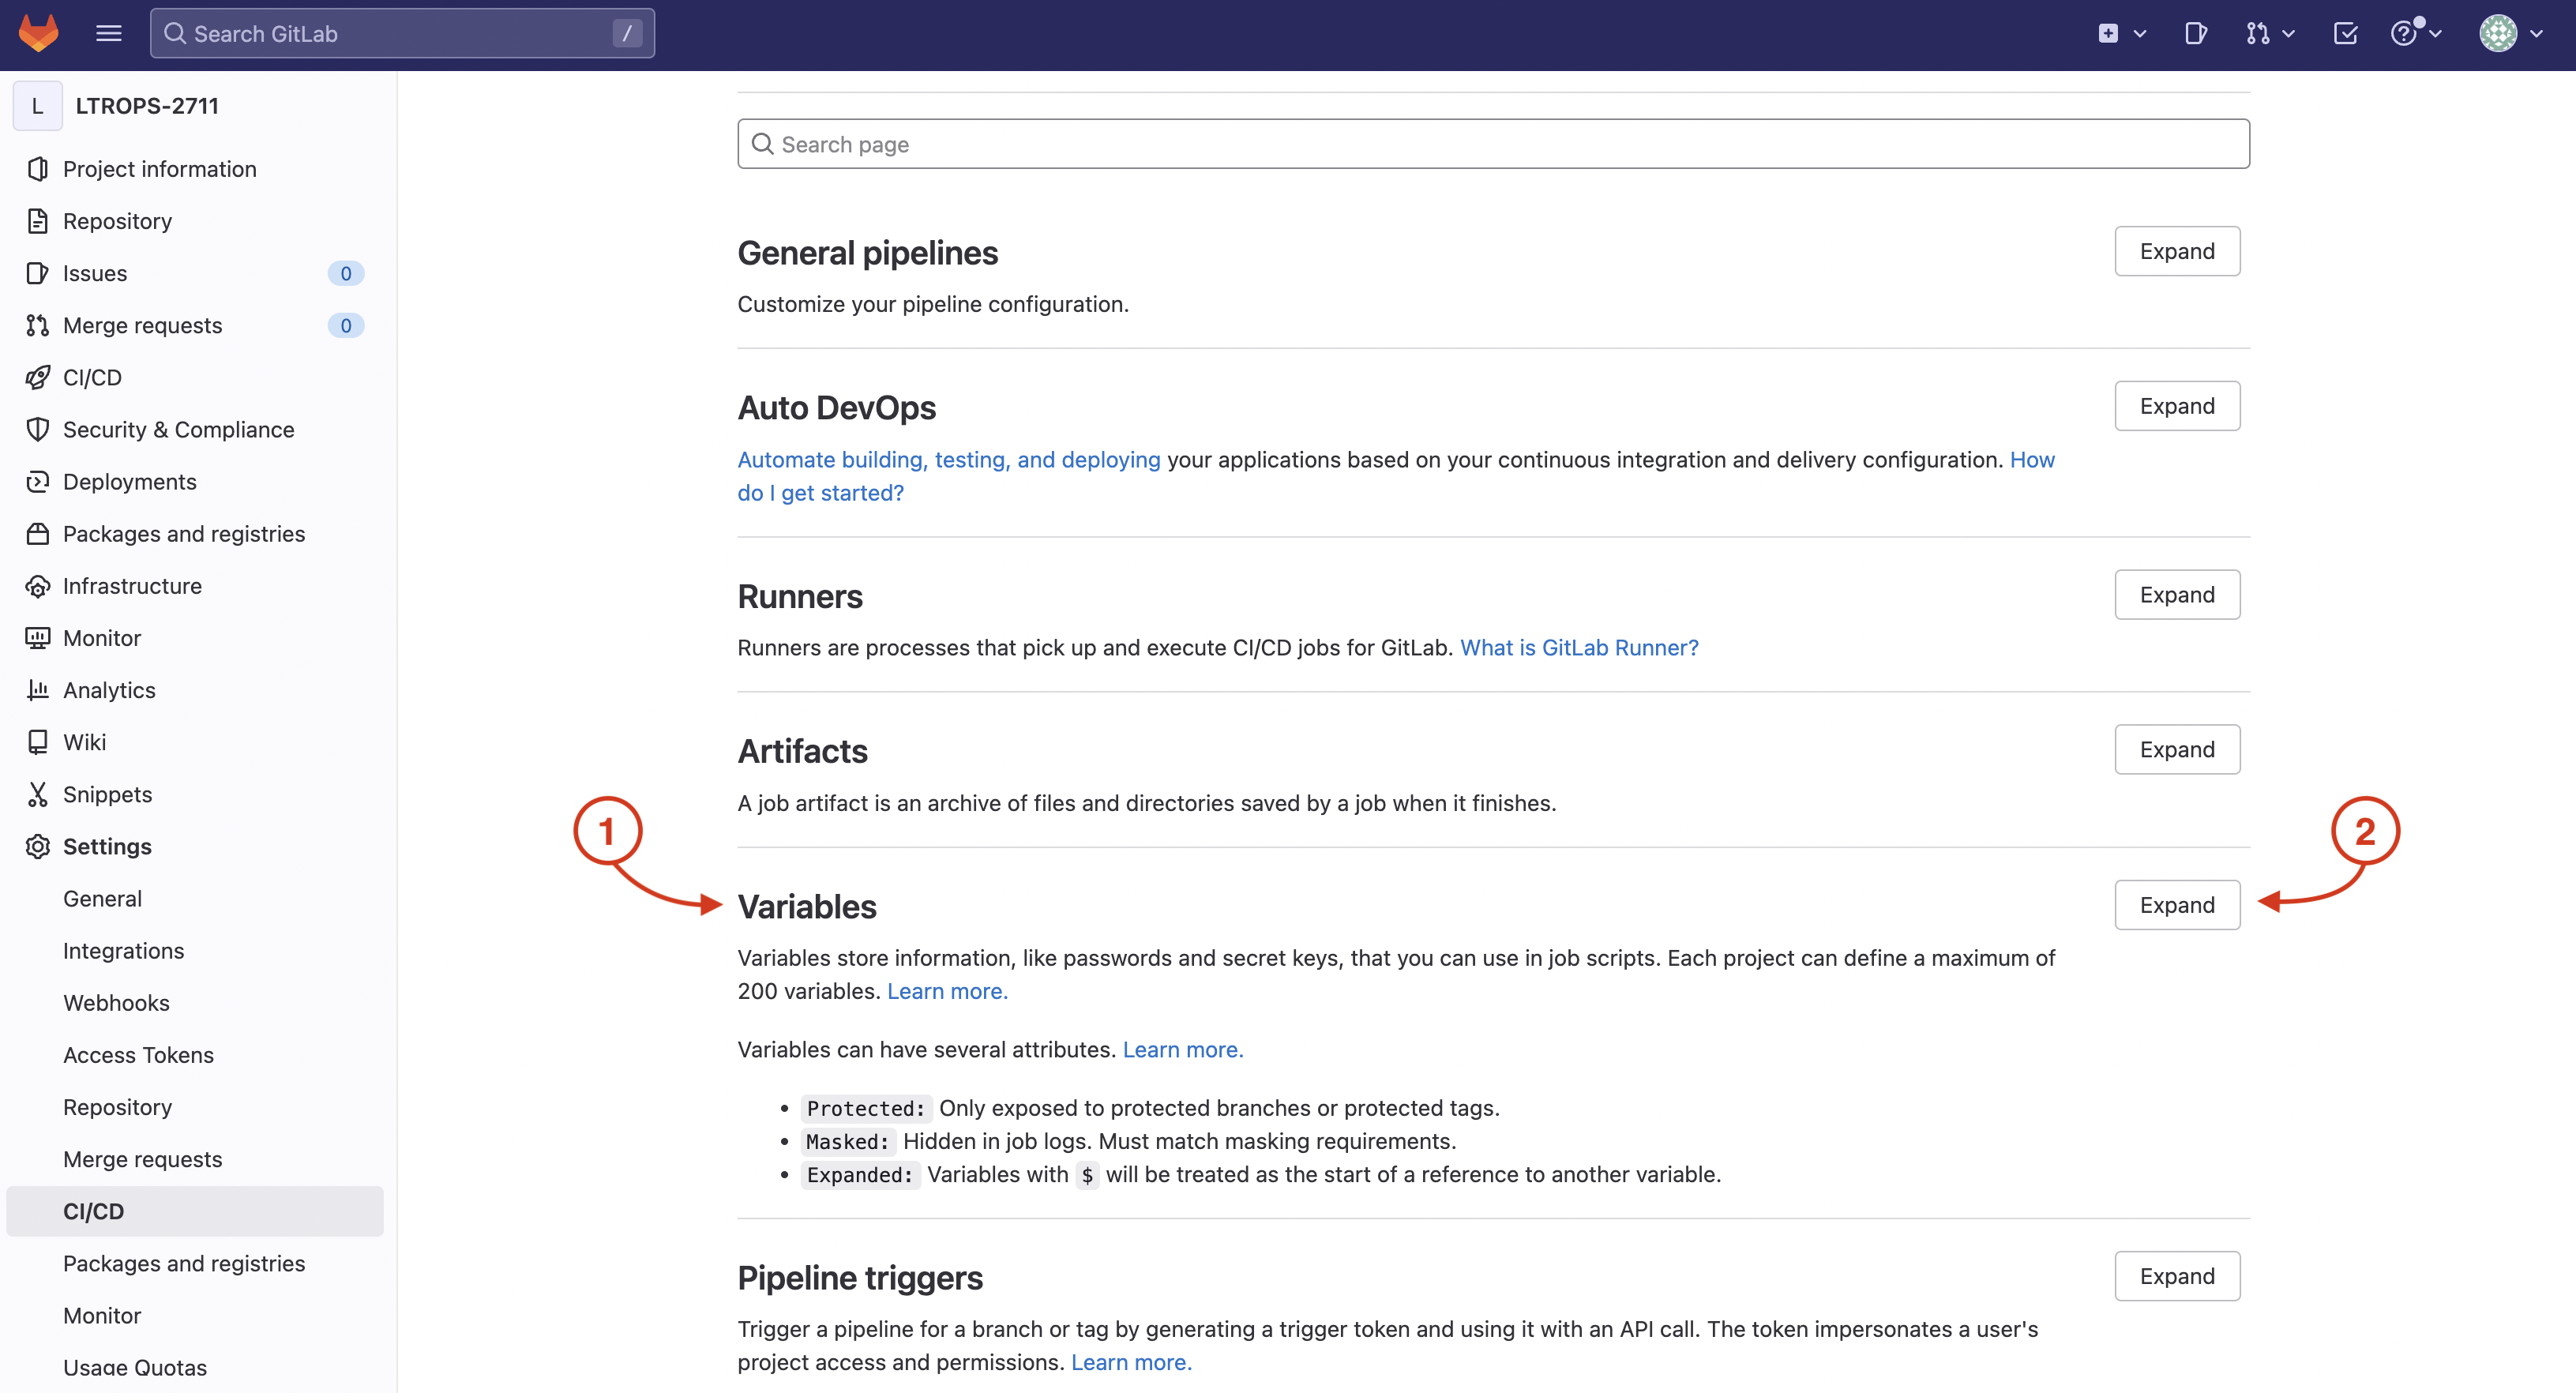
On your GitLab repo's CI/CD Settings page:
You will create the .gitlab-ci.yml file in the LTROPS-2711 repository root. This file defines the complete CI/CD pipeline configuration including all stages, variables, and job definitions.
code-server -r .gitlab-ci.yml
nac-validate command validates all YAML configuration files in the data directory against the NaC schema, ensuring proper syntax and structure.
The output is captured using validate_output.txt for later review and stored as an artifact.
validate:
  stage: validate
  script:
    - set -o pipefail && tofu fmt -check |& tee fmt_output.txt
    - set -o pipefail && nac-validate ./data/ |& tee validate_output.txt
  artifacts:
    paths:
      - fmt_output.txt
      - validate_output.txt
  cache: []
  only:
    - merge_requests
tofu init command initializes the Terraform backend and downloads required provider plugins.
The tofu plan command generates an execution plan showing what resources will be created, modified, or deleted.
The plan output is saved for review and as GitLab artifacts for tracking changes.
plan:
  stage: plan
  resource_group: nxos
  script:
    - tofu init -input=false
    - tofu plan -out=plan.tfplan -input=false
    - tofu show -no-color plan.tfplan > plan.txt
    - tofu show -json plan.tfplan | jq > plan.json
    - tofu show -json plan.tfplan | jq '([.resource_changes[]?.change.actions?]|flatten)|{"create":(map(select(.=="create"))|length),"update":(map(select(.=="update"))|length),"delete":(map(select(.=="delete"))|length)}' > plan_gitlab.json
  artifacts:
    paths:
      - plan.json
      - plan.txt
      - plan.tfplan
      - plan_gitlab.json
    reports:
      terraform: plan_gitlab.json
  dependencies: []
  needs:
    - validate
  only:
    - merge_requests
tofu apply command applies the plan generated in the previous stage without manual intervention, automating the configuration deployment.
The stage depends on the plan stage and only runs after successful validation and planning.
deploy:
  stage: deploy
  resource_group: nxos
  script:
    - tofu init -input=false
    - tofu apply -input=false -auto-approve plan.tfplan
  dependencies:
    - plan
  needs:
    - plan
  only:
    - merge_requests
---
image: cait:26.2
stages:
  - validate
  - plan
  - deploy

variables:
  GIT_SSL_NO_VERIFY: "true"
  NXOS_USERNAME:
    description: "Cisco NX-OS Username"
  NXOS_PASSWORD:
    description: "Cisco NX-OS Password"
  TF_HTTP_USERNAME:
    description: "GitLab Username"
    value: "gitlab-ci-token"
  TF_HTTP_PASSWORD:
    description: "GitLab Access Token"
    value: "${CI_JOB_TOKEN}"
  WEBEX_ROOM_ID:
    description: "Cisco Webex Room ID"
  WEBEX_TOKEN:
    description: "Cisco Webex Bot Token"
  GITLAB_API_URL:
    description: "GitLab API v4 root URL"
    value: "${CI_API_V4_URL}"
  TF_HTTP_ADDRESS:
    description: "GitLab HTTP Address to store the TF state file"
    value: "${GITLAB_API_URL}/projects/${CI_PROJECT_ID}/terraform/state/tfstate"
  TF_HTTP_LOCK_ADDRESS:
    description: "GitLab HTTP Address to lock the TF state file"
    value: ${TF_HTTP_ADDRESS}/lock
  TF_HTTP_LOCK_METHOD:
    description: "Method to lock TF state file"
    value: POST
  TF_HTTP_UNLOCK_ADDRESS:
    description: "GitLab HTTP Address to unlock the TF state file"
    value: ${TF_HTTP_ADDRESS}/lock
  TF_HTTP_UNLOCK_METHOD:
    description: "Method to unlock TF state file"
    value: DELETE
  TF_HTTP_SKIP_CERT_VERIFICATION:
    description: "Skip SSL certificate verification"
    value: "true"
  SSL_CERT_DIR: /etc/gitlab-runner/ssl

cache:
  key: terraform_modules_and_lock
  paths:
    - .terraform
    - .terraform.lock.hcl

validate:
  stage: validate
  script:
    - set -o pipefail && tofu fmt -check |& tee fmt_output.txt
    - set -o pipefail && nac-validate ./data/ |& tee validate_output.txt
  artifacts:
    paths:
      - fmt_output.txt
      - validate_output.txt
  cache: []
  only:
    - merge_requests

plan:
  stage: plan
  resource_group: nxos
  script:
    - tofu init -input=false
    - tofu plan -out=plan.tfplan -input=false
    - tofu show -no-color plan.tfplan > plan.txt
    - tofu show -json plan.tfplan | jq > plan.json
    - tofu show -json plan.tfplan | jq '([.resource_changes[]?.change.actions?]|flatten)|{"create":(map(select(.=="create"))|length),"update":(map(select(.=="update"))|length),"delete":(map(select(.=="delete"))|length)}' > plan_gitlab.json
  artifacts:
    paths:
      - plan.json
      - plan.txt
      - plan.tfplan
      - plan_gitlab.json
    reports:
      terraform: plan_gitlab.json
  dependencies: []
  needs:
    - validate
  only:
    - merge_requests

deploy:
  stage: deploy
  resource_group: nxos
  script:
    - tofu init -input=false
    - tofu apply -input=false -auto-approve plan.tfplan
  dependencies:
    - plan
  needs:
    - plan
  only:
    - merge_requests
Be sure to save your file! Not saving will result in your code not executing.
It is time to add these files with Git in preparation for committing them to the repo. You perform the action of adding files with git add. You will add your .gitlab-ci.yml file and add your data directory.
git add .gitlab-ci.yml
git add data/
git commit -m "Initial Fabric Deployment"
git push -u origin fabric-deployment
Continue to the next section to review the pipeline details, trigger the pipeline, and review the execution results.